Introduction:
Adding and managing staff members in GymOwners.com is a vital part of running your gym efficiently. From coaches and trainers to managers and front desk staff, assigning the correct roles and permissions ensures your team has the right access to support your operations effectively. This guide walks you through the process of adding staff members in GymOwners.com and assigning them appropriate roles based on their responsibilities.
Process description:
You’ll enter the staff member’s basic information, assign them an appropriate role (such as Owner, Manager, Coach, or Staff), and then create the account. Once submitted, the staff member will receive an email to verify their address and set a password, allowing them to log in and begin managing their responsibilities based on their assigned permissions.
Gathering materials/resources:
- Full names and email addresses of staff members.
- Defined staff roles within your business (e.g., Coach, Manager).
- Optional: Staff phone numbers, birthdates, and start dates.
Step-by-step instructions:
- In the top navigation bar, click on Operational.
- From the dropdown menu, select Staff.
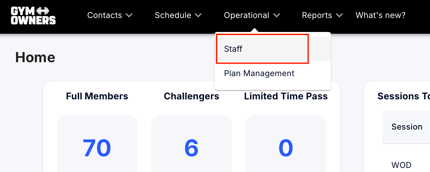
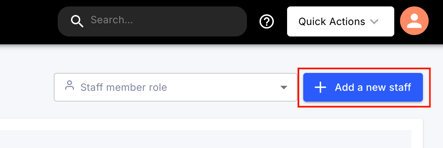
- Once you are on the Staff page, click on the Add a new staff button.
This will open the Staff Information page, where you can input the staff member’s details.
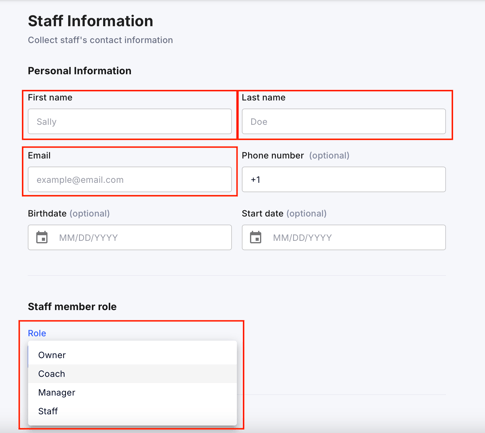
- On the Staff Information page, you’ll need to complete the following fields:
- First Name and Last Name: Enter the staff member's full name.
- Email: Provide the staff member's email address. This will be used to send verification and login details.
- Phone Number (optional) : Enter the staff member's phone number.
- Birthdate (optional) : Add the staff member’s birthdate.
- Start Date (optional) : Select the staff member's start date.
- Under Staff Member Role, select the appropriate role for the staff member:
- Owner
- Coach
- Manager
- Staff
Role Explanation:
Owners and Managers: Have full access to financial data, reporting, and all operational settings, including billing, memberships, and staff management.
Coaches and Staff: Have limited access focused on scheduling and client management. They cannot view financial data on the home dashboard or access any reports containing financial information.
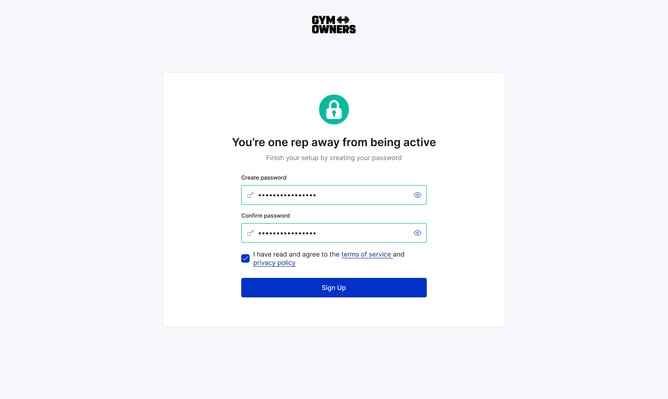
After entering all information and selecting a role, click Create Staff. The staff member will receive a verification email. Once they verify their email, they’ll be prompted to set a password. After setting their password, they can log in and begin managing their assigned tasks.
Tips and best practices:
- Ensure each staff member uses a unique email address.
- Regularly review staff roles and update permissions as responsibilities change.
- Encourage staff to set strong passwords and update them periodically.
Next steps:
- Assign staff members to specific sessions or classes via the Schedule section.
- If needed, edit staff roles later by returning to the Staff tab in Operational Settings.