Introduction:
Creating and managing rooms within your location is essential for organizing your class schedule, managing space, and optimizing capacity. Accurate room setup helps streamline your operations, ensures sessions are properly allocated, and allows for capacity-based scheduling. This guide outlines how to add or edit rooms in your GymOwners.com account.
Process description:
When setting up or editing a room, you'll start by assigning it to one of your existing locations. Then, you’ll define its physical size (square footage) and set an optional capacity limit, which controls how many members can register for a session held in that room. These capacity limits help prevent overbooking and can be overridden manually for specific sessions if needed.
Additionally, you can include internal notes that may be helpful for your team—such as reminders about shared equipment, flooring type, or room availability. These notes are not visible to members but can support better communication and operational clarity for your staff.
Gathering materials/resources:
Room details such as name, size, and capacity.
Any relevant notes about the room.
Step-by-step instructions:
- In the top-right corner of the dashboard, click on the profile icon.
- From the dropdown menu, select Business Settings.
- Within Business Settings, click on Rooms.
- To add a new room, click on the Add a Room button.
If you need to edit an existing room, find the room you want to edit and click the Edit icon next to it.
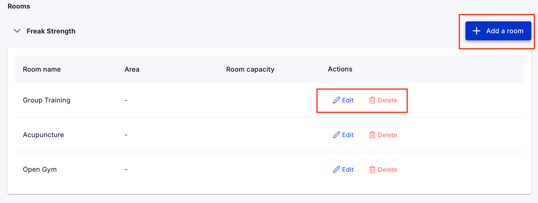
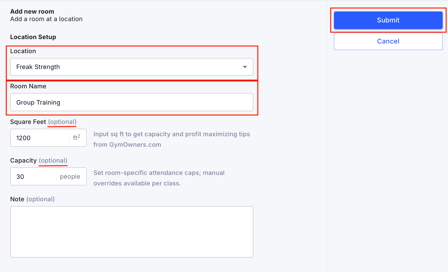
- Once the Add New Room or Edit Room page opens, fill in the following information:
- Location: Select the location for the room from the dropdown (e.g., Freak Strength).
- Room Name: Enter the name of the room (e.g., Cardio Studio, Weight Room).
- Square Feet (Optional): Input the room's size in square feet. This can help you optimize capacity and get profit-maximizing tips from GymOwners.com.
- Capacity (Optional): Enter the room’s capacity. You can set specific attendance caps for classes held in this room. Manual overrides are available for individual classes if needed.
- Note (Optional): Add any notes relevant to the room that may be useful for your staff or scheduling.
- Once all the necessary information is filled out, click Submit in the top-right corner.
Tips and best practices:
- Use clear, consistent room names to avoid confusion when scheduling.
- If your facility frequently uses multi-purpose spaces, include notes to guide staff.
- Setting room capacity helps prevent overbooking and supports better space planning.
Next steps:
Begin assigning rooms to your scheduled classes or sessions.
Review room usage periodically to determine if adjustments in layout, scheduling, or capacity are needed.
If new rooms are added or existing ones are repurposed, return to this section to update details accordingly.