Introduction:
Keeping your gym’s location details accurate in GymOwners.com is essential for clear communication, correct scheduling, and accurate financial reporting. This includes your address, timezone, contact information, sales tax settings, and optional kiosk setup. Keeping this information up to date ensures members have the correct details for check-ins and session times, and that the appropriate tax rates are applied to assigned plans.
Process description:
Location settings are managed through the Location Management section within Business Settings. This is where you can update your gym’s address, contact information, timezone, tax settings, and kiosk preferences.
Step-by-step instructions:
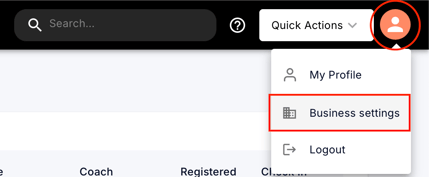
- In the top-right corner of the dashboard, click on the Profile icon.
- From the dropdown menu, select Business Settings.
- Within Business Settings, click on Locations.
- Find the location you want to update and click Edit.

- Once the Edit Location page opens, you'll need to fill in the following information:
- Location Setup:
- Location Type: Select the appropriate type either physical, virtual, or both.
- Location Name: Enter the name of your gym.
- Types: Multi-select the type of services you offer.
- Square Feet: Optionally, input the size of your facility in square feet (e.g., 2800 ft²).
- Configuring Sales Tax:
- Do you collect sales tax on any transactions? If so, enter the applicable sales tax rate (e.g., 5%).
- Note: GymOwners.com allows you to toggle sales tax on and off for certain plans or transactions. The system will only increase the amount passed on to your client by the sales tax percentage and show this in your reporting. You are responsible for all tax filings.
- Please consult your tax advisor to ensure the correct rate is being applied.
- Do you collect sales tax on any transactions? If so, enter the applicable sales tax rate (e.g., 5%).
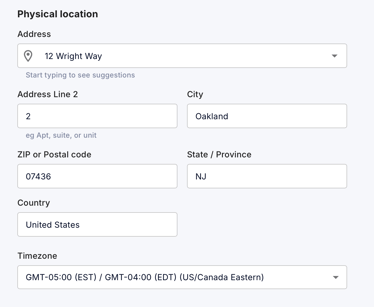
- Enter Physical Location Details:
- Address: Input your gym’s address. We will auto-complete the rest of this section as
you start typing. - City: Enter the city.
- ZIP or Postal Code: Fill in the postal code.
- State/Province: Select the state.
- Country: Confirm the country.
- Address: Input your gym’s address. We will auto-complete the rest of this section as
- Verify Your Timezone
- Timezone: Verify and select the correct timezone (e.g., GMT-05:00 (EST) / GMT-04:00 (EDT) (US/Canada Eastern)).
- Important: Setting the correct timezone is crucial for scheduling and ensuring your appointments and classes are displayed accurately.
- Add Contact Information
- Customer Service Phone Number: Enter your customer service phone number.
- Customer Service Email: Provide the email address for customer support.
- Kiosk (optional)
- Note: GymOwners.com Kiosk streamlines check-ins for your members with a customizable check-in page. Members can easily scan their QR code or search their name to check-in for open gym or a session.
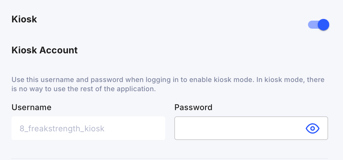
- Set toggle to on
Enter a password for the kiosk user (the kiosk username is automatically created).
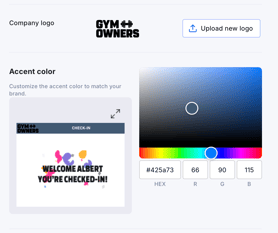
Upload your company logo and select a color (if desired, otherwise, the 'gym owners' logo will be displayed on the kiosk).
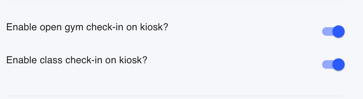
- Toggle on the Check-In types that you wish to use on your kiosk.
- Enable open gym check-in on kiosk?: For member check-ins into open gym.
- Enable class check-in on kiosk?: For member check-ins into a class/session.
Or toggle on both Class and Open Gym check ins: If you wish to allow member to check-in both to classes or open gym.
- Location Setup:
- Once all the information is filled out, click Save changes in the top-right corner.
Tips and best practices:
- Update this information whenever your location, contact, or tax details change.
- If using kiosk, do a quick check-in test to confirm settings are working.
- Use your logo to create a consistent, branded check-in experience.